Posts Tagged useful

Create a DVD tutorial. Part 8

This post begins from from here: Create a DVD tutorial in case you are lost.

In this post series I talk about mastering a DVD from various DVD sources.

In this post I will show you how to look at the DVD iso master file you created using DVD styler in the previous post

I will use WinRAR, a shareware file archiving application to extract the files to a folder, then use VLC media player to look at the DVD as if you had created a real DVD and put it into a real player. You can test the menus, videos and proof read any text before burning to CD.

If you find any corrections, go back and use DVD Styler to re-create the ISO file, as described in the previous post, including your corrections.

Steps to Check the DVD iso master file:

  1. Use WinRAR to uncompress the DVD file to a folder on the desktop.
  2. Open the DVD folder using VLC media player
  3. Navigate the menus and play through the DVD

Step 1: Use WinRAR to uncompress the DVD file to a folder on the desktop.

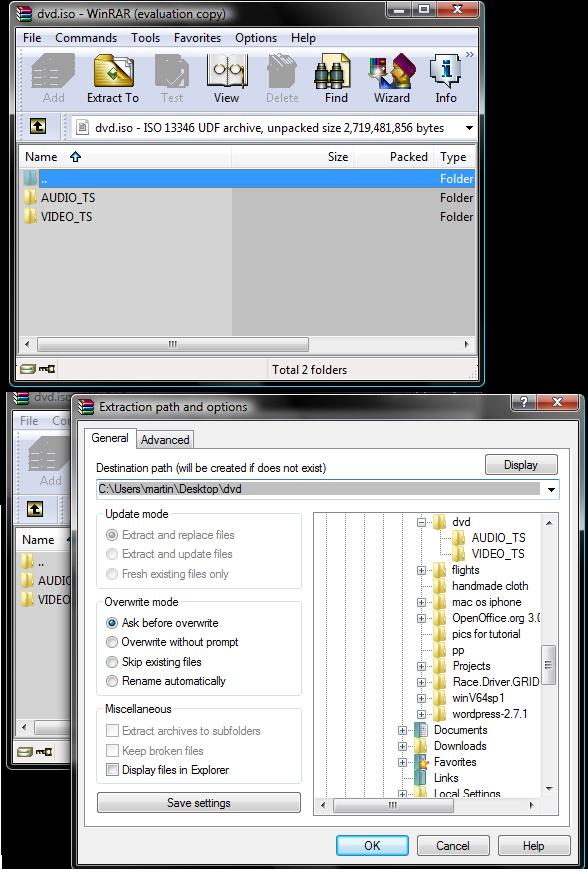
After downloading and installing WinRAR (http://www.rarlab.com/), right click on the dvd iso file and select Open with → WinRAR application. This opens the WinRAR dialog as shown..

This is the contents of a standard DVD. Both folders should be extracted. Click on the “Extract to…” button at the top of the window. Be sure not to have any folders selected in the main window pane, that will extract only what is selected. Instead everything is needed.

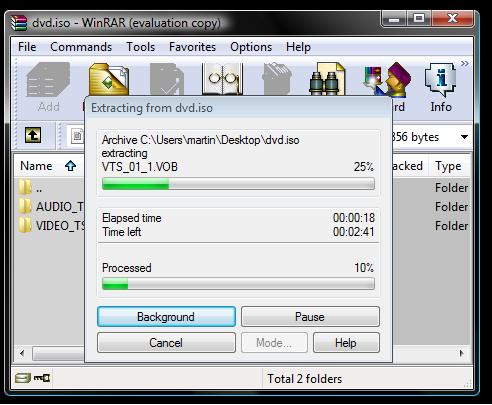
Select a folder to extract to. I chose “DVD” on the desktop folder. Click OK to begin.

This stage took about 3 minutes for me, but it will depend on the speed of your computer and size of DVD image file.

Step 2: Open the DVD folder using VLC media player

Open VLC media player and click Media → open disk (or press CTRL + D)

In the disk open menu, select a DVD as a disk, then click on the Browse button. Navigate to the folder with your extract files in it. Previously I extracted my files to “DVD” on the desktop, so I selected that folder and the path was populated.
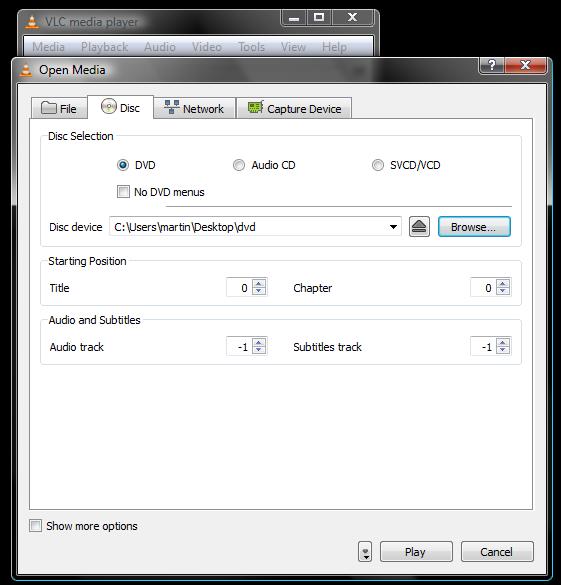
Open media dialog, with disc device path selected

Finally, click Play to load the DVD.

Step 3: Navigate the menus and play through the DVD

You should now see the DVD main menu. Use the standard play controls to navigate through the DVD. Use the mouse to click on the menu options. Note down any mistakes and go back to DVD styler if you need to make corrections and repeat the process.

Once you are satisfied with the final DVD image, its time to move on to the final step and burn it to a recordable DVD.
Share Button

Tags: , , , , , , ,

No Comments

Article Archive Page Added. Add your own archive page easily! (code included)

Last night I added an article archive page to this site. It makes it easier to navigate all the blog posts by listing all the blog posts by title on one single page. It is sorted in chronological order. My intention is to have all the articles easily accessible so anyone can quickly scan through any posts of interest. This is better than a standard blog page as typically you would have to wade through the whole content over multiple pages.

The credit for the archive page code goes to stylizedweb.com for his post. The steps are there on this person’s page and they are reasonably clear, however it requires knowledge of ftp, the folder structure of your wordpress installation and notepad or other text editor to modify php code. I noticed a couple of mistakes in his php insert code which caused it not to work on my page straight off, so I will post what i did…

Steps to create an archive index page on your wordress site (For wordpress 2.7.1)

1. Make an archives2.php file – First step is to make a new page template file. I went to my theme directory /wp-content/themes/arc/ using my ftp client ( where arc is the folder for the theme ) and copied index.php over to my desktop. This was then renamed to archives2.php ( I called it this because this theme already had an archives.php file, didn’t want to get rid of it just in case. Note that the filename doesn’t matter as no reader will see it )

2. Modify the code in the archives2.php file – Now this file must be customised for making a template. Edit the file with a text editor. I used notepad on windows. For me I had the first block of text..

<?php
/* Arclite/digitalnature */
get_header();
?>

This needs to be changed to..

<?php
/*
Template Name: Martins Archives Page
*/
?>

The name here is only used for your own reference so it can be anything you like. Save the file now

3. Remove the page code and replace with new code – This I belive is the hardest step because you need to see what background code is (i.e. Side bars, background, links, etc) and see what the main code for that page is. The way I did it was to look at the code I needed to put in…

<?php if (have_posts()) : ?>
<?php while (have_posts()) : the_post(); ?>

<!– post –>
<div id=”post-<?php the_ID(); ?>” <?php if (function_exists(“post_class”)) post_class(); else print ‘class=”post”‘; ?>>

<div class=”post-header”>
<h3><a href=”<?php the_permalink() ?>” rel=”bookmark” title=”<?php _e(‘Permanent Link:’,’arclite’); echo ‘ ‘; the_title_attribute(); ?>”><?php the_title(); ?></a></h3>
<p class=”post-date”>
<span class=”month”><?php the_time(__(‘M’,’arclite’)); ?></span>
<span class=”day”><?php the_time(__(‘j’,’arclite’)); ?></span>
</p>
<p class=”post-author”>
<span><?php printf(__(‘Posted by %s in %s’,’arclite’),'<a href=”‘. get_author_posts_url(get_the_author_ID()) .'” title=”‘. sprintf(__(“Posts by %s”,”arclite”), attribute_escape(get_the_author())).’ “>’. get_the_author() .'</a>’,get_the_category_list(‘, ‘)); ?> <?php edit_post_link(__(‘Edit’,’arclite’),’ | ‘); ?></span>
</p>
</div>

<div class=”post-content clearfix”>
<?php if(get_option(‘arclite_indexposts’)==’excerpt’) the_excerpt(); else the_content(__(‘Read the rest of this entry &raquo;’, ‘arclite’)); ?>

<?php
$posttags = get_the_tags();
if ($posttags) { ?>
<p class=”tags”> <?php the_tags(__(‘Tags:’,’arclite’).’ ‘, ‘, ‘, ”); ?></p>
<?php } ?>
</div>

<div class=”post-links”>
<?php
global $id, $comment;
$number = get_comments_number( $id );
?>
<a class=”<?php if($number<1) { echo ‘no ‘; }?>comments” href=”<?php comments_link(); ?>”><?php comments_number(__(‘No Comments’,’arclite’), __(‘1 Comment’,’arclite’), __(‘% Comments’,’arclite’)); ?></a>
</div>

</div>
<!– /post –>

<?php endwhile; ?>

<div class=”navigation” id=”pagenavi”>
<?php if(function_exists(‘wp_pagenavi’)) : ?>
<?php wp_pagenavi() ?>
<?php else : ?>
<div class=”alignleft”><?php next_posts_link(__(‘&laquo; Older Entries’,’arclite’)) ?></div>
<div class=”alignright”><?php previous_posts_link(__(‘Newer Entries &raquo;’,’arclite’)) ?></div>
<div class=”clear”></div>
<?php endif; ?>
</div>
<?php else : ?>
<h2><?php _e(“Not Found”,”arclite”); ?></h2>
<p class=”error”><?php _e(“Sorry, but you are looking for something that isn’t here.”,”arclite”); ?></p>
<?php get_search_form(); ?>
<?php endif; ?>

At the top you can see the line <?php if (have_posts()) : ?>  – this is the beginning of the loop which shows every single post in the archive. I then looked at the archives2.php file I had.. I saw..

<?php if (have_posts()) : ?>
<?php while (have_posts()) : the_post(); ?>

Quite near the top of the file. It was also indended. Scrolling down I also found the closing <?php endif; ?> for that starting if line. The indentation helped me to see this was page content and not the background for each page. I removed it all and replaced it with the required code mentioned earlier. Note that I have no experience whatsoever for php programming, this was done only by looking at the <?php tags within the file. Now save this file. Dont worry if you think you did it wrong, even if it wont work, the worst youll see on your site is an error message and you can try again. No damage will occur and you wont lose your previous posts.

4. Upload the new archives2.php to your theme folder where you got your index.php file from.

5. Make a new page. Go to your admin page on your website and make a new page. Call it something meaningful such as “Archives page” (this is what the reader will see for the page name) Dont add any text to the body of the page.

6. Apply the template. On the right hand sidebar ‘attributes’ you should see Template. Under that drop down you should now see your “martins archive page” or whatever you called it earlier. Select this and then click publish. Youre done!

Navigate to the page to see how it looks. If you get a page which looks nothing like your other pages (i.e. background gone) or an error line at the top and nothing else, then something went wrong. I have found the error lines quite helpful as it tells you the line number to check. Turns out my initial code had spaces in <?php…  so it was  <? php…  and that crashed it.Just try to re-upload a fixed file until you get what you want. There is no irreversible damage here as you are using your own file and not wrecking anything else in the theme. Even if you do accidentally damage a critical theme file, you can just re-install the theme and restore.

I hope this is of use to you, It makes navigation much easier for your blog posts and articles so I would highly recommend it, even if you dont regard yourself as a programmer or it seems a little messy. Let me know how you get on and post links to your own sites’ archive pages here!

Share Button

Tags: , , , , , , ,

1 Comment