This post begins from from here: Create a DVD tutorial in case you are lost.
In this post series I talk about mastering a DVD from various DVD sources.
This post talks about using DVD Decryper to rip a DVD’s tracks to the computer.
Step 2 Using DVD Decrypter to rip the tracks.
If you haven’t done so already, download DVD Decrypter (http://www.dvddecrypter.org.uk/) Even though it says that development has stopped, the download file is still available.
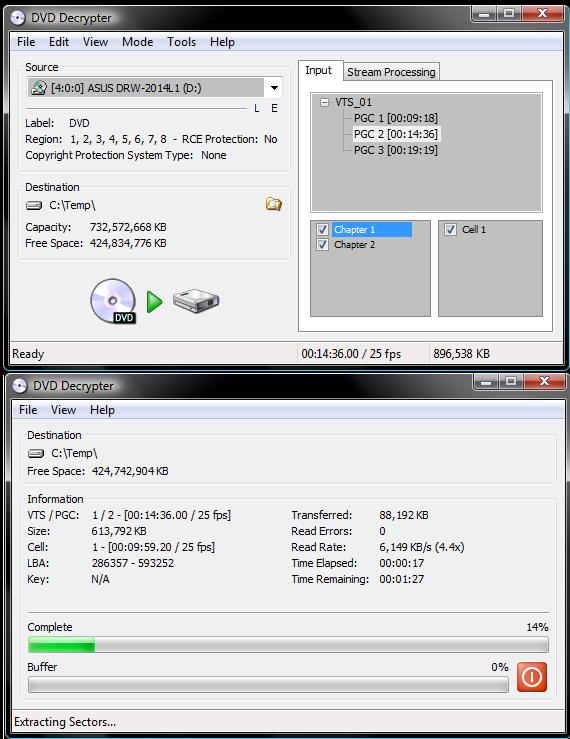
To get the selected DVD tracks on to the hard drive, I used this software on each DVD. When I loaded in a DVD, it listed the tracks at the right of the screen with tick boxes to select which tracks and chapters you wanted to copy. A track contains many chapters and its impossible to see how long each chapter is using this software. It is possible to rip by chapter, but because I didnt know which ones to tick, I just selected them all from one track.
The next step is to choose the destination folder. This is shown on the left part of the window (see the picture) and there is a small folder icon to select a folder to save to. In this case I just put it to C:\Temp folder.
The next step is to click the big DVD/Hard drive icon at the bottom left. This starts the program with the settings given. The bottom snapshot shows what the window now looks like. It rips the selected DVD tracks to file. This process takes a few minutes, and at the end you will have files in the C:\Temp folder. These are the ripped dvd videos.
There are lots of settings to be played about with in this program but I found just doing the simple actions of choosing what to rip, where to put it and click to start was all the options I needed for this purpose. If you feel adventureous you could have a look in all the menus and see what tweaks can be done.


